7.2 Creating Map and Atlasses in QGIS
Course Objectives
In this section, you should be able to:
- Understand how to load the dataset
- Understand how to symbolize the dataset
- Understand how to create a map
- Understand how to create an atlas
Learning Activities
Creating an atlas in QGIS allows users to create a series of maps for geographic regions with a set template. This atlas template allows for a large number of maps to be generated for areas of interest, such as districts, wards, and other administrative areas, with the same style and layout.
HOT Project Examples:
- Open Cities in Monrovia, Liberia
- LEGIT in Liberia
- Ramani Huria in Dar es Salaam, Tanzania (Dar es Salaam, Tanzania)
The following guide provides instructions and screenshot from QGIS 3.30. Versions before and after may have different icons and steps
Skills and technology needed:
- Installation of QGIS
- Navigating QGIS and adding data
- GIS data files (i.e. shapefiles, geojson)
- Example shapefiles zip
This activity covers the process of generating and configuring a map and atlas in print layout. Example shapefiles are provided for this activity but can be followed with shapefiles provided by the user.
1. Preparing Map Data
Before creating an atlas, you will need to add and style layers. While styling layers, you will need to consider how the layers will look in print composer. As maps in the atlas may be at varying scales, it may be necessary to return to styling after generating the atlas to make adjustments.
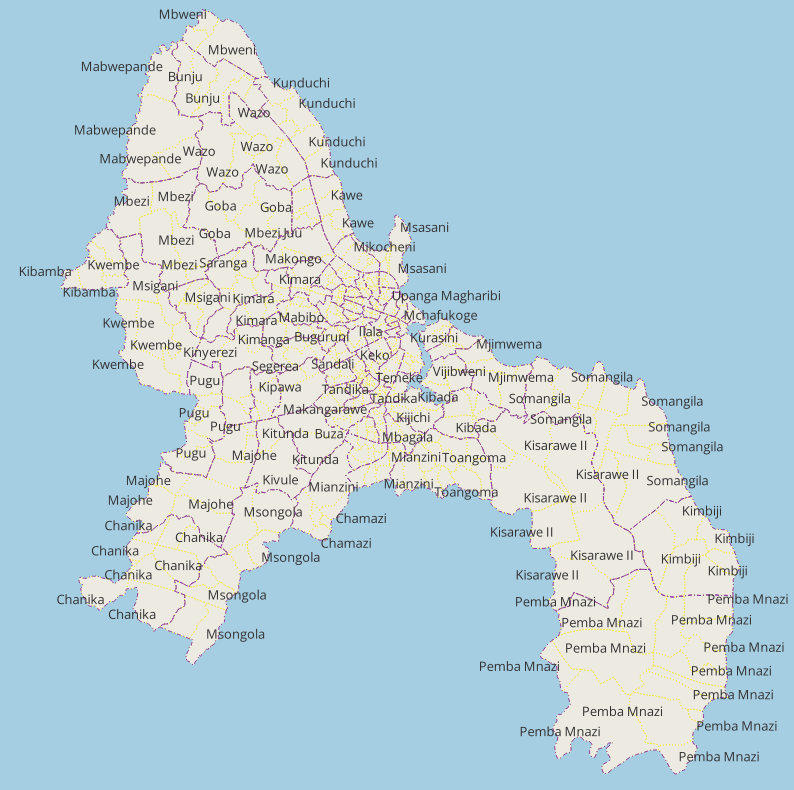
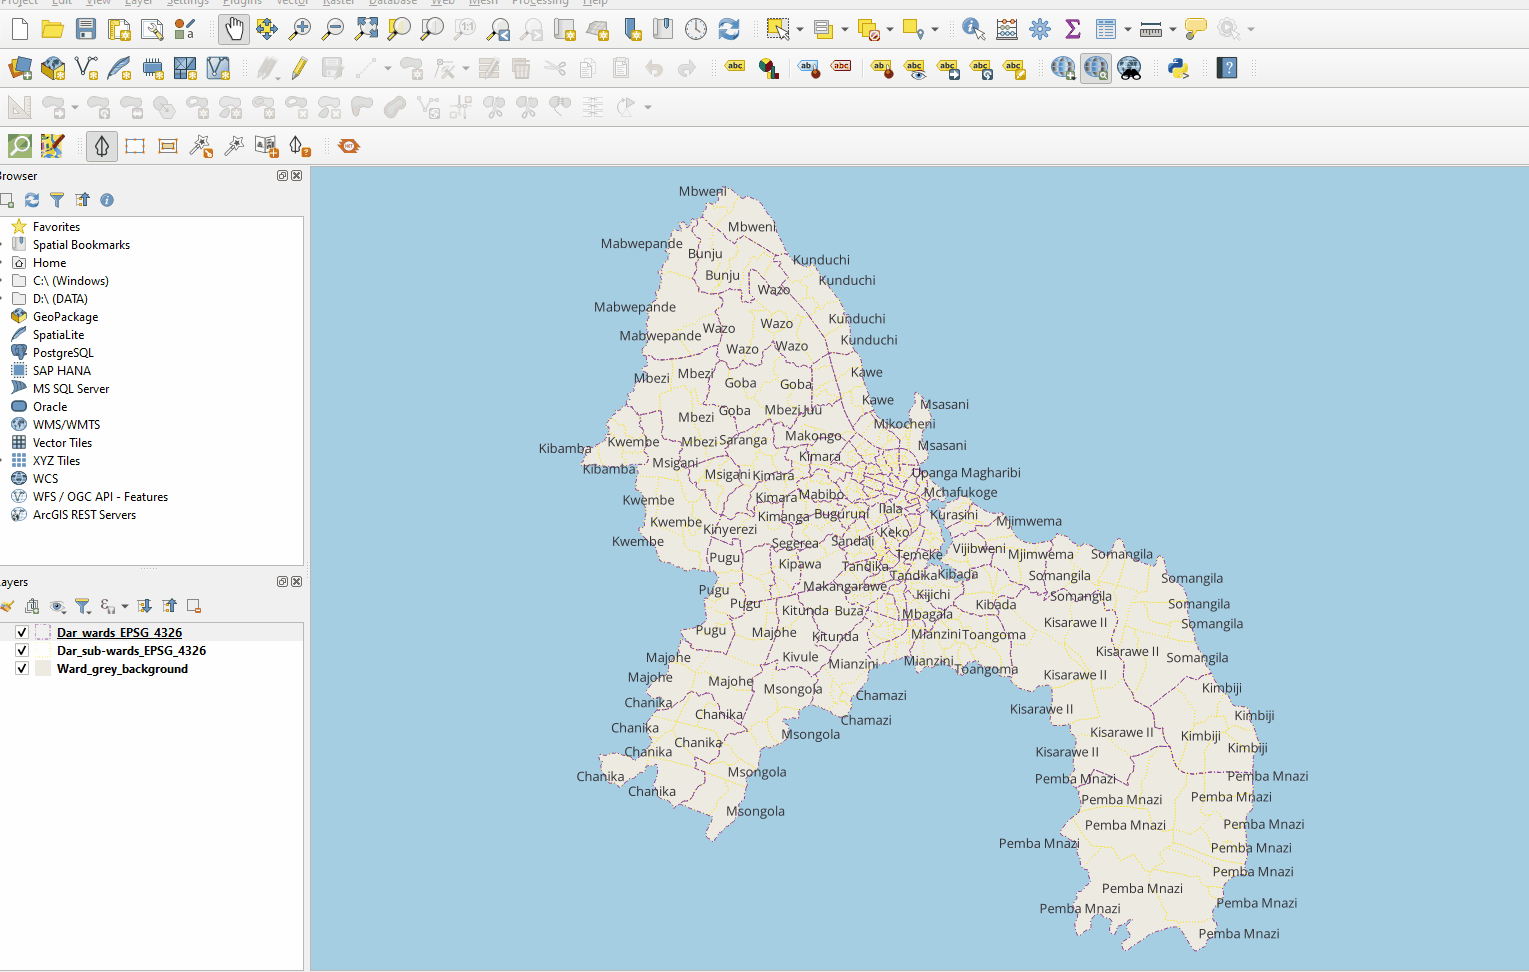
To follow along with the practice steps, add the following vector data to your map:
- Dar_sub-wards_EPSG_4326
- Dar_wards_EPSG_4326
Change the background color of the project. Open the ‘Project’ menu from the top toolbar, select ‘Properties’. Under general settings, change the background color to blue.
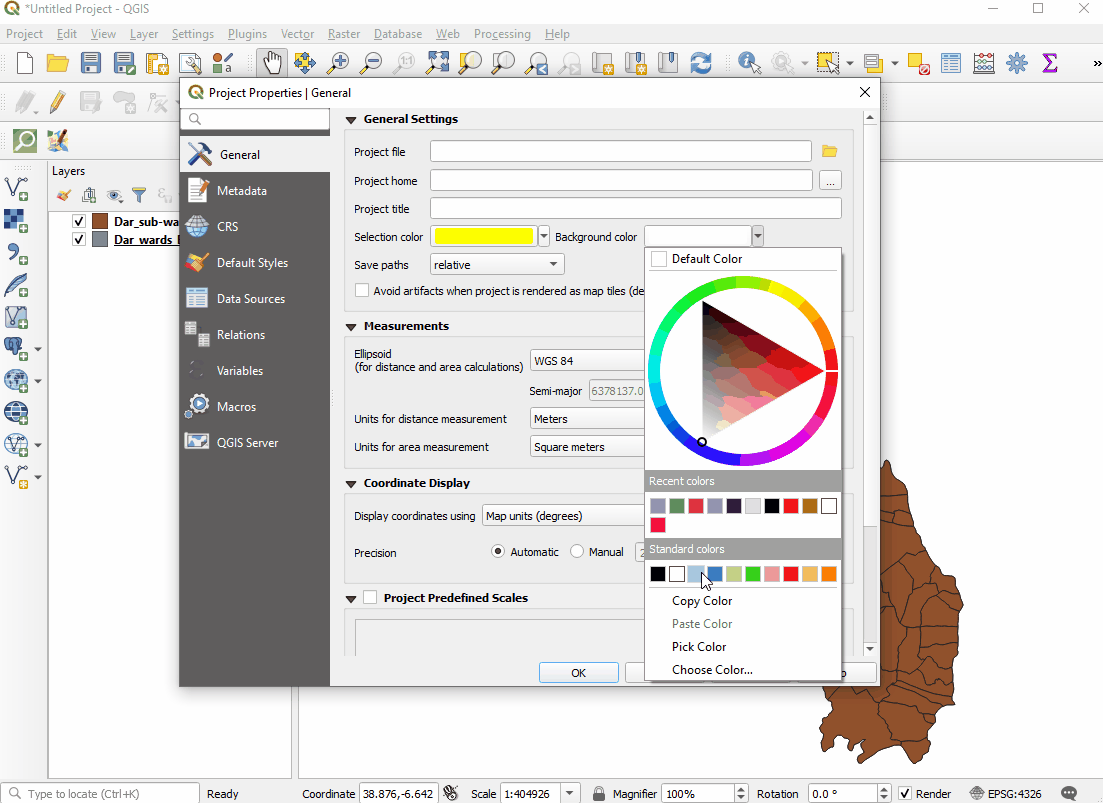
Style the ward layer (Dar_wards_EPSG_4326) by right-clicking on the name in the Layers Panel and selecting Properties. In the pop-up window, select Symbology from the side menu. Style as described below:
- Select ‘Simple Fill’ from the upper right window.
- Change ‘Symbol layer type’ to ‘Outline: Simple Line’
- Change the color to purple.
- Change the ‘Pen style’ to ‘Dash Dot Line’
- Select ‘Apply’ and then ‘OK’.
Duplicate the ward layer (Dar_wards_EPSG_4326) by right-clicking on the name in the Layers Panel and selecting ‘Duplicate’. Right-click on the copy layer and select rename. Rename this layer as ‘Ward_grey_background’.
Style the ‘Ward_grey_background’ layer by right-clicking on the name in the Layers Panel and selecting Properties. In the pop-up window, select ‘Symbology’ from the side menu. Style as described below:
- Select ‘Simple Fill’ from the upper left window.
- Change ‘Symbol layer type’ to ‘Simple fill’
- Change the color to the html code #edeae2 (or select a light grey color).
- Change the ‘Outline style’ to ‘No pen’.
- Select ‘Apply’ and then ‘OK’.
Style the sub-ward layer (Dar_sub-wards_EPSG_4326) by right-clicking on the name in the Layers Panel and selecting ‘Properties’. In the pop-up window, select **Symbology **from the side menu. Style as described below:
- Select ‘Simple Fill’ from the upper right window.
- Change ‘Symbol layer type’ to ‘Outline: Simple Line’
- Change the color to yellow.
- Change the ‘Pen style’ to ‘Dot’.
- Select ‘Apply’ and then ‘OK’.
After styling the sub-ward layer (Dar_sub-wards_EPSG_4326), select ‘Labels’ from the side menu in ‘Properties’.
- In the top drop down menu, change the option from ‘No Labels’ to ‘Single Labels’.
- For ‘Value’, select the option ‘Ward_Name’ from the drop-down menu.
- Change your ‘Text’ options such as font, font size, font color, etc.
- Select ‘Apply’ and then ‘OK’.
After styling all layers, ensure that your layers are in the following order in your layers panel. (To adjust layer ordering, left-click and hold on a layer and then drag up or down in the list.)
- Dar_wards_EPSG_4326
- Dar_sub-wards_EPSG_4326
- Ward_grey_background
2. Creating Map Layout in Print Layout
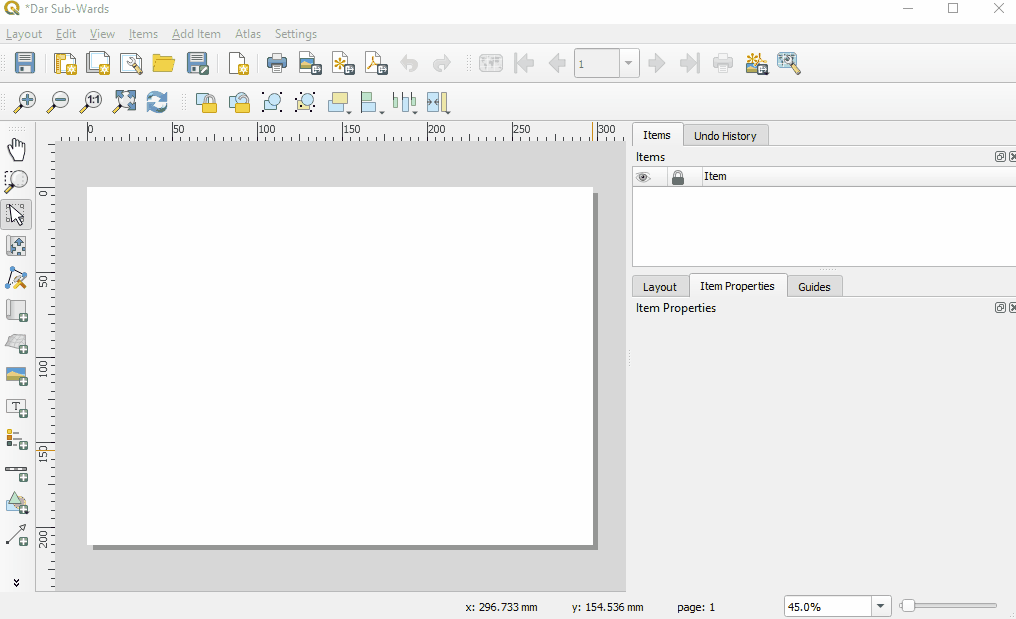
Open the ‘Project’ menu from the main toolbar, and select ‘Layout Manager’. A layout manager window will appear. Select Empty Layout and click Create.
In the pop-up window, create a title for your map. This can be a unique name to describe your map’s purpose such as “Dar Sub-Wards”. A new window will be created with a blank page. This shows how your map will look printed out.
At minimum, you will need to add the following common elements of a map to the map canvas:
- Map
- Title
- Legend
- Scale Bar
- North arrow
Each of these elements can be added by opening the ‘Add Item’ menu on the top toolbar or by using the quick access buttons on the left-hand toolbar.
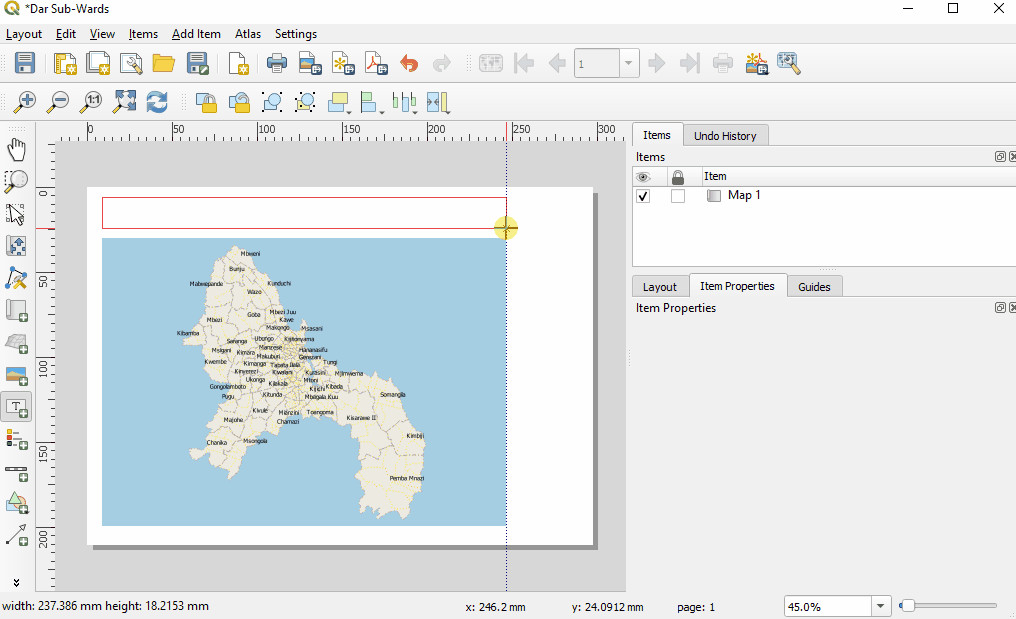
Add your map by selecting ‘Add Map’ from the ‘Add Item’ menu (alt: use the Add Map tool from the left-hand toolbar). You will need to draw the box by clicking and dragging the corners.
Add a title to your map by selecting ‘Add Label’ from the ‘Add Item’ menu (alt: use the Add Label tool from the left-hand toolbar). Like the map, you will need to draw the box by clicking and dragging the corners. The default text is ‘Lorem ipsum’. This can be changed in the ‘Item Properties’ panel. Change the font and size of your title.
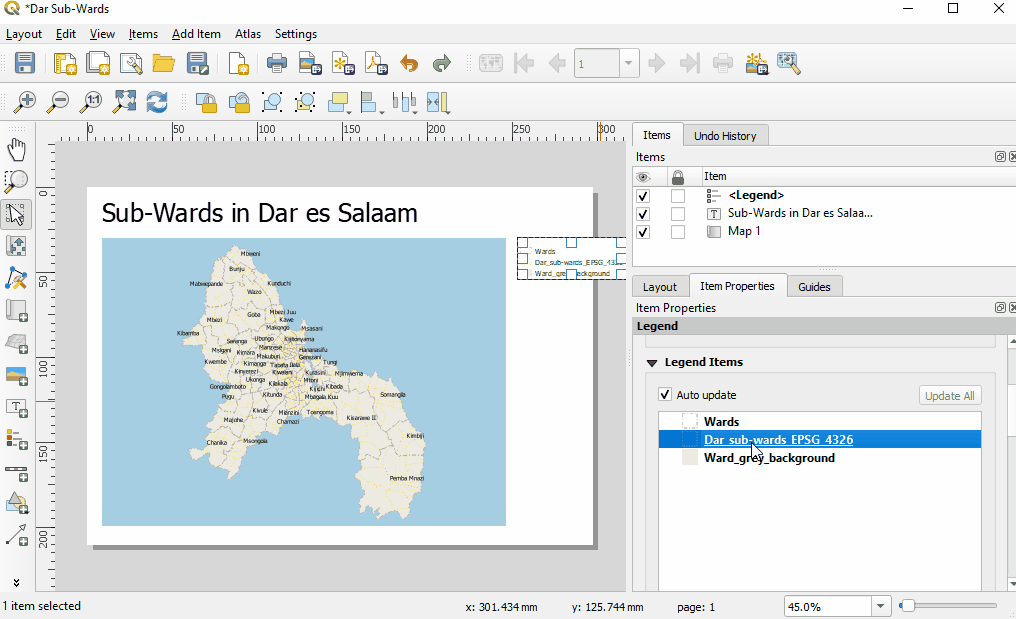
Add a legend to your map by selecting ‘Add Legend’ from the ‘Add Item’ menu. The size of the Legend will be generated based on its contents. You can change the size as well as add or remove legend items in the ‘Item Properties’ panel.
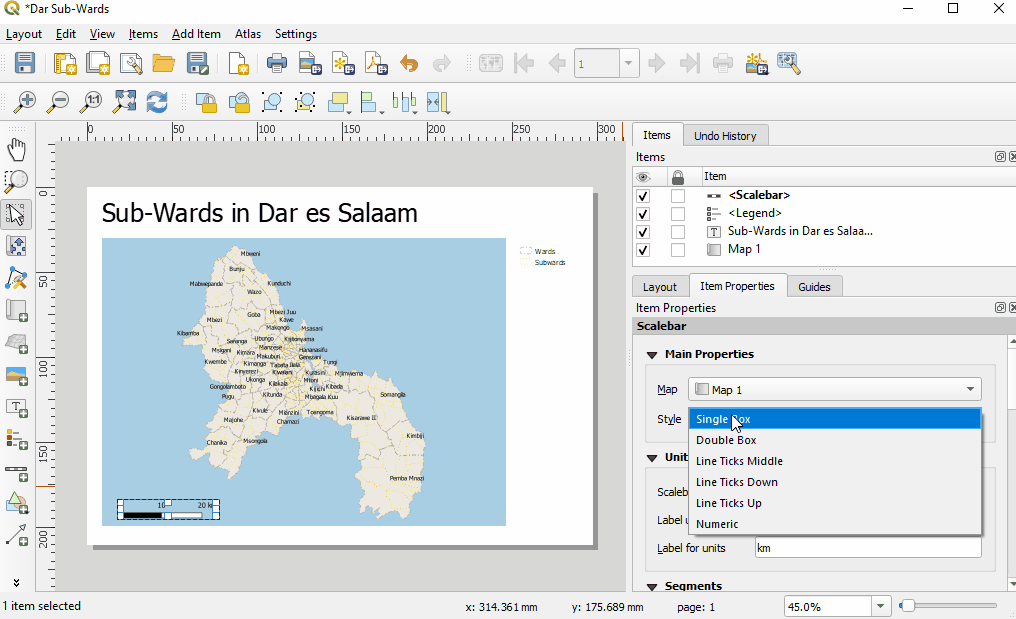
Add a scale bar to your map by selecting ‘Add Scalebar’ from the ‘Add Item’ menu. Like the map, you will need to draw the box by clicking and dragging the corners.
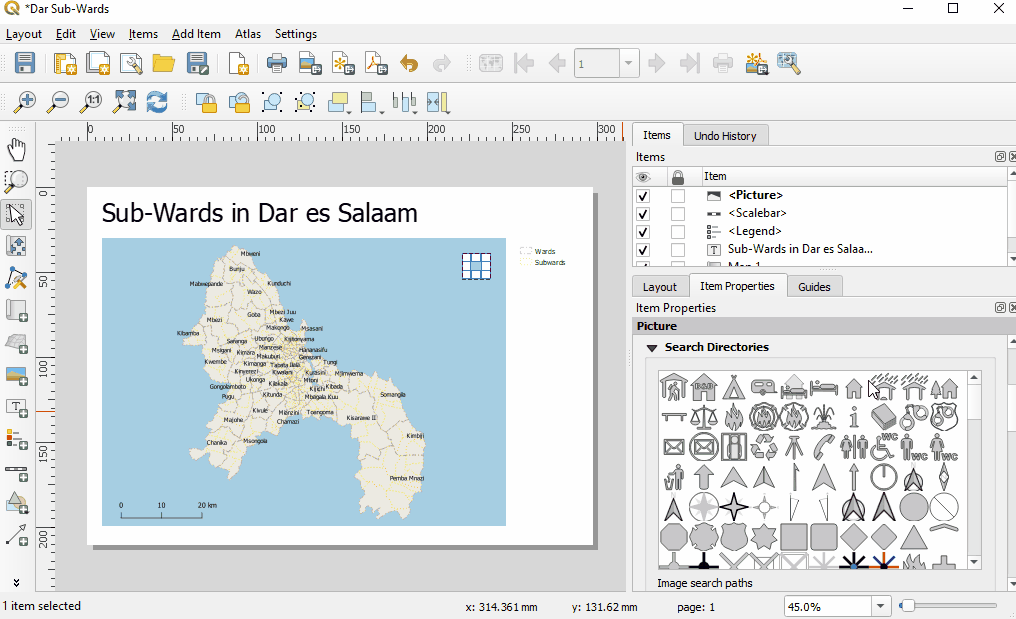
North arrow can be added by selecting ‘Add Image’. Like the map, you will need to draw the box by clicking and dragging the corners. In the ‘Item Properties’ panel, open the ‘Search Directories’ option to select from a choice of symbols.
Move these items around your Map Canvas until you are pleased with the layout of your map. Think of your audience: will they understand the information you want to convey?
3. Saving Maps
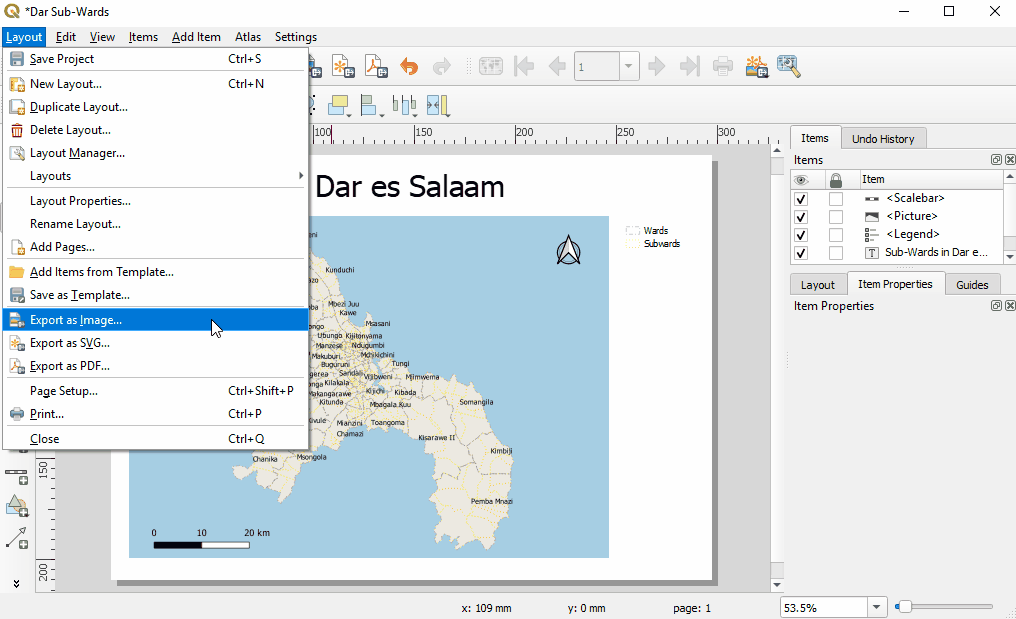
At this stage, you can decide if you want to save the map as a single map or move on to generate an atlas. If you would like to save the current map as a stand-alone map, open the ‘Layout’ Menu and select one of the ‘Export as…’ options depending on your file preference.
4. Generating Multiple Map using Atlas Generation
After completing the layout for your map, you are ready to generate the atlas. Select the map box and in the ‘Item Properties’ panel, check the box for ‘Controlled by Atlas’.
In the right-hand panel, select the tab for ‘Atlas generation’, near the ‘Composition’ and ‘Item properties’ tabs. If this tab is not appearing, select the ‘Atlas’ menu from the top toolbar, then select ‘Atlas Settings’.
In the ‘Atlas’ panel, check the box next to ‘Generate an atlas’ to begin configuring your atlas.
4.1. Configuration
The configuration options in the atlas generation panel controls how the atlas is generated.
- The ‘Coverage layer’ is the layer that contains the geographic areas of interest for your atlas. For example, for an atlas showing maps of each district you will need to select your district layer.
- ‘Page name’ allows you to name pages by either selecting an attribute from the coverage layer or building an expression from attribute table values.
- If you do not want to show all areas included in your coverage layer, ‘Filter with’ allows you to filter out geographic areas that you do or do not want to include in your atlas. This option requires an expression to be built.
- ‘Sort by’ allows you to order your atlas by an attribute of your coverage layer.
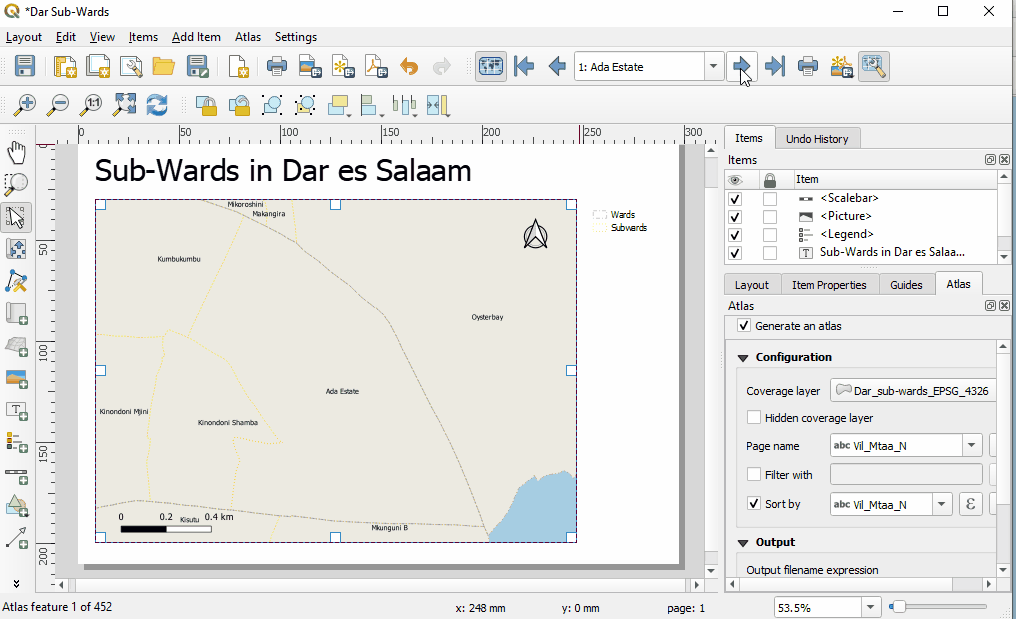
Practice
- Select ‘Dar_sub-wards_EPSG_4326’ as the coverage layer.
- For page name, select ‘Vil_Mtaa_N’. (This field is the sub-ward name.)
- Check the box for ‘Sort by’ and select ‘Vil_Mtaa_N’. (This field is the sub-ward name.)
4.2. Atlas Toolbar and Navigation
Once the atlas is generated, you will be able to preview and navigate through the atlas with the atlas toolbar. To navigate, first select the ‘Preview atlas’ button. Changes can be made to the atlas layout while in preview mode.
4.3. Building Expression for Data-driven Text
Expressions allow for text such as labels and titles to be data-driven, or generated from attributes. When working with an atlas, expressions take attributes from the coverage layer.
- Text that is not data driven should be written within single quote marks. Example: ‘Map’
- Spaces between words should be indicated with a space within single quote marks. Example: ‘Map of ’
- Selected values and plain text need to be separated by the operator ‘||’. This operator can be typed or selected from the ‘Operators’ list. Example: ‘Map of’ ||
- Data-driven text, or text that is generated from attributes, can be selected from the ‘Fields and Values’ list. Example: ‘Map of ’ || “Ward_Name”
- An ‘Output preview’ will generate at the bottom of the expression builder window.
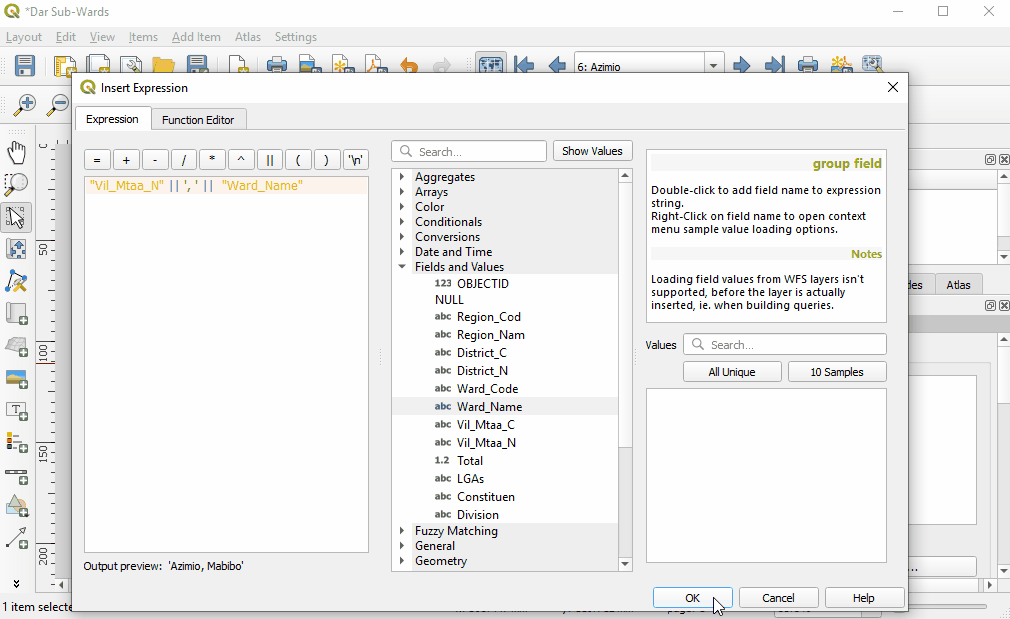
Practice
- Select or create your title box and select “Insert expression” in the ‘Item Properties’ panel.
- Use the ‘Fields and Values’ list to generate the following expression:
“Vil_Mtaa_N” || ‘, ’ || “Ward_Name” - Check the output preview to make sure the expression was typed correctly.
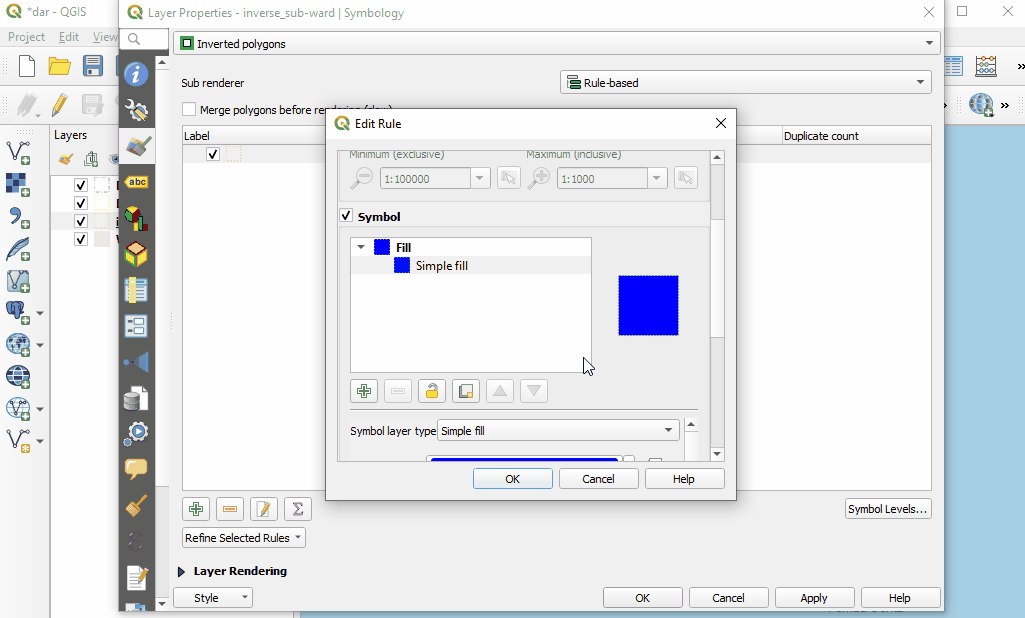
4.4. Inverse Polygon Layer
Adding an inverse polygon layer can focus the map by shading out or completely covering features outside your area of interest.
- Return to the main QGIS window.
- Select the layer used as the coverage layer in the Print Composer. Right-click and select ‘Duplicate’
- Right-click on the layer copy and select rename. Rename the layer.
- Right-click on the layer and open properties. Select ‘Style’ from the side menu.
- In the top drop-down menu, select ‘Inverted polygons’.
- Under ‘Sub renderer:’, select ‘Rule-based’ from the drop down menu.
- In the rules list window, double click on ‘(no filter)’ to open the ‘Edit rule’ window.
- In the ‘Edit rule’ window, select the ‘…’ button to create a filter. An expression builder will open. In the expression window, type or build from the Variable list: $id=@atlas_featureid
- In the ‘Edit rule’ window, make sure that the symbol type is Simple Fill.
- Change the transparency to 50%.
- Change the color to dark grey.
- Click ‘Ok’ to exit all option windows.
Practice
- Complete all steps above.
- For step 2, this will be the “Dar_sub-wards_EPSG_4326” layer.
- For step 3, rename the file “inverse_sub-wards”.
4.5. Adding Overview Maps
Overview maps allow the audience to understand the map’s focal location within the context of a larger area. For example, an overview map may show a ward’s location within the city. In QGIS, an overview map can be created that will automatically show the map location for each atlas page.
- In the main QGIS window, select the layers you would like to have in the overview map. These should typically be layers that can be viewed easily on a small scale (i.e. boundaries, highways, waterways). Multiple layers can be selected at a time by holding Ctrl on your keyboard while selecting.
- Right-click on these layers and select ‘Duplicate’.
- Select all of the copied layers. Right-click and select ‘Group Selected’. This allows for better data management and makes it easier to turn groups of layers on and off depending on the map needs.
- Right-click on this group and rename it ‘Overview Map’
- Turn on all grouped layers and turn off all others by clicking the check boxes next to the layer names.
- Return to your Print Composer.
- Open the ‘Layout’ menu from the top toolbar and select ‘Add map’. Draw a small box for your overview map.
- Go to the ‘Item Properties’ panel for the second map and open the ‘Overviews’ options.
- Click the green ‘+’ button to add an overview.
- For ‘Map frame’, select ‘Map 0’ from the drop down menu.
- ‘Frame style’ will allow you to change the color, outline, and transparency of the map frame.
- In the ‘Items Properties’ panel, open the ‘Layers’ option and select ‘Lock layers’. This will keep the limited layers while allowing for the main map to show all layers.
- Return to the Main QGIS window. Turn off all grouped overview layers and turn on the other layers.
Practice
- Follow all steps above.
- For Step 1, select the layers ‘Dar_wards_EPSG_4326 copy’, ‘Dar_sub-wards_EPSG_ 4326 copy’, and ‘Ward_grey_background copy’.’
4.6. Atlas Review
After completing the layout and atlas generation, it is important to check each page of the atlas for correct expression generation (i.e. all pages are correctly titled) and that the appearance of layers and labels in each map appear correctly. If there is a large difference between map scales for different pages, styles, labels, grids, and other factors may need to be adjusted to best suit all map scales.
Practice:
- Use the ‘Atlas toolbar’ to navigate through your atlas pages.
- For each page, check:
- Map layer visibility
- Label visibility
- Expression-driven text (i.e. title, additional text boxes)
- Scalebar size and placement
4.7. Output Filename Expression
Prior to exporting the atlas, an output filename expression needs to be built. This expression will determine the name for each page of the exported atlas files. See ‘Building expressions’ for instructions on building expressions.
The default expression is ‘output_’||@atlas_featurenumber which will produce a filename such as “Output 3”. This can be changed to create a more accurate filename for your maps.
Practice:
- Select the expression builder button
- Build the expression: “District_N” || ‘’ || “Ward_Name” || ‘’ || “Vil_Mtaa_N”
- Check the output preview at the bottom of the expression builder to make sure that the expression has been built correctly.
4.8. Exporting Atlas
To export the atlas, select the ‘Export Atlas’ button in the Atlas tool bar. Select the appropriate file type (Export as Images, Export as SVG, or Export as PDF) and select the folder where the files will be exported to.
4.9. Atlas Templates
Atlas templates can be saved and added to other QGIS projects. To save a template, open the ‘Project’ menu from the top toolbar and select ‘Save as Template’. This will save as a Composer Template (*.qpt *.QPT) file.
To add the template to another project, open a new print composer. Open the ‘Project’ menu from the top toolbar and select ‘Add items from Template’. Note: items will be sized to the original document page size. Item sizes may need to be adjusted if the new project is using a different page size.
[Quiz] Check Your Knowledge
-
If we want to build multiple map at the same time, which feature from QGIS we need to use?
a. Map Batch Creator
b. Atlas Generation
c. QuickMapService
d. Layout Manager
-
Once the atlas is generated, you will be able to preview and navigate through the atlas with the atlas toolbar by selecting…
a. Preview atlas
b. Preview document
c. Preview manager
d. Preview page
-
Atlas templates can be created and added to other QGIS project as a *.qpt or *.QPT file.
a. True
b. False
Answer: 1. B | 2.A | 3.A
Activity Checklist
Now you already understand how to create a map using QGIS. By the end of this section, you should be able to:
- Preparing data
- Style the dataset using symbology and label
- Building map layout using map composer and export the map
- Create atlas using atlas generation feature